Hi everyone,
Another dramatic painterly river view flight of fancy from my crazed imagination. 🙂

Kind regards


Hi everyone,
Another dramatic painterly river view flight of fancy from my crazed imagination. 🙂
Kind regards
Hi everyone,
I’ve never liked converging verticals when photographing buildings, trees or anything else containing vertical structures, I’d go so far as to say I detest them. If one wants to avoid cutting off the top of such scenes when correcting and cannot afford to spend time setting up a tripod and fiddling around with keystone correction in the camera or justify the cost of a special shift/tilt lens as I can’t then the answer is deceptively simple and straightforward. Do not crop too tightly, this goes against my usual habit of cropping in camera. Here one needs to allow for what I call “wiggle room” as it’ll be needed when using perspective correction software such as DXO Viewpoint (my choice of software) or similar. So, leave some space above the building/scene and also, to a lesser extent to the sides of the frame. How much to allow is something that one gets a feel for the more one does it. Allow way too much and one ends up cropping and that’s something that I try and avoid having to do.
If one wants to roughly approximate what happens when correcting perspective using such software then take one’s hands and place them sideways on and horizontally parallel to one another and tilt them inwards towards each other at a slight angle, say 10-15 degrees so that your fingertips point inwards towards each other . Then line the tops of your fingers up with a horizontal surface say the top of one’s computer monitor. The top of the monitor then becomes the top of your image frame. Now, without changing position move your hands so that they are vertically parallel to one another. Note that the tips of your fingers now extend above the top of the monitor and thus anything in the top of the frame will now be cut off if one chooses to maintain the given aspect ratio. One can choose to make the image un-constrained which can often work in which case you’ll probably end up with a squarer image, not so good when considering framing options though. 🙂
Some examples:

Note the squarer image, in this shot I almost allowed enough room at the top but the very top of the cross would have been cut off if I’d chosen to maintain the 4×3 aspect ratio. Moving back a fraction or zooming out and that wouldn’t have been the case.

Plenty of room in the above shot to get everything corrected.

Same in this shot although I only just made it 🙂
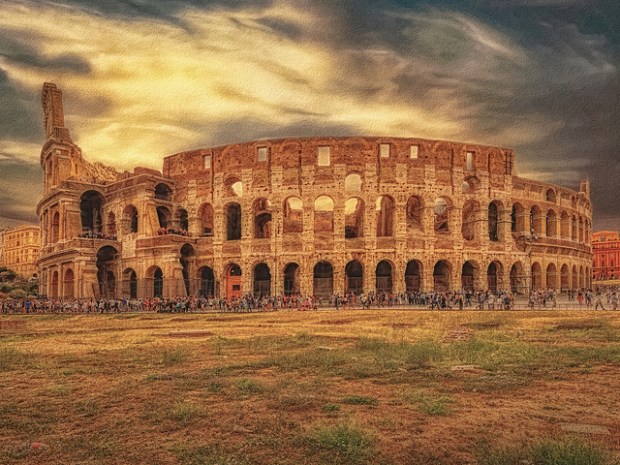

Plenty of room here too, I’d have hated to have the top of the Colosseum chopped off. In this case it’s the buildings to the extreme left and right of the frame that I chose as my reference when correcting.
Finally, here’s a few more shots which worked well.


Hope this is of interest,
Kind regards
Hi everyone,
A toned monochrome work of St. Peter’s in Rome.
Best wishes,
Hi everyone,
My lightest weight travel gear consisting of my Olympus OM-D E-M5 Mk 2 body plus M.Zuiko 9-18 mm and Panasonic 14 mm, 12-32 mm and 35-100 mm lenses weighs in at an amazingly light combined weight of approximately 900 grams (2 lbs) ! with battery and memory card fitted. Or, to put it another way, less than the weight of a bag of sugar!.
These lenses aren’t my fastest lenses but they are my lightest and cover 99% of my requirements. I don’t frequently require the “buttery smooth” bokeh that is so often raved about nor do I often require a shallow depth of field as most of my travel works are landscapes and I like to stop-down a bit, usually to about F5.6 or so. The exception to this being interiors where the light can and often is poor and I really don’t like flash so I’ll make the most of available light thus I pack my 14 mm Panasonic F2.5 which does the job nicely and serves as a one lens general purpose backup, I can live with the extra 2 ounces in weight 🙂 . Thanks to the Olympus’ amazing IBIS (in body image stabilisation) I rarely have to resort to increasing the ISO which is something I only do when there’s no alternative and only then by a stop or two at the most.
I’m firmly of the opinion that one can pay a fortune for the “best” lenses which are a stop or two faster and arguably sharper but it’s no fun carrying their extra bulk and weight around on foot all day long and the monetary saving is substantial to say the least. As for the difference in image quality between these lenses and their faster more expensive counterparts one has to pay a heck of a lot more money and the difference in image quality is in no way reflected in the price difference.


Panasonic LUMIX G 14mm F2.5

Panasonic 12-32 mm/F 3.5-5.6 LUMIX G VARIO MEGA OIS ASPH

Olympus M.ZUIKO Digital ED 9-18 mm 1:4.0-5.6
The above shots linked to full size images on my Flickr Page
As for my dream lens it’d be a zoom lens covering the above focal length range, weighing no more than their combined weight, ideally less, with equivalent sharpness and not appreciably larger than the largest of the lenses and of course at an affordable price, bring it on!. 🙂
Kind regards
Hi everyone,
I spotted this florist shop by the roadside on one of my travels and thought it might make an interesting work.
Kind regards
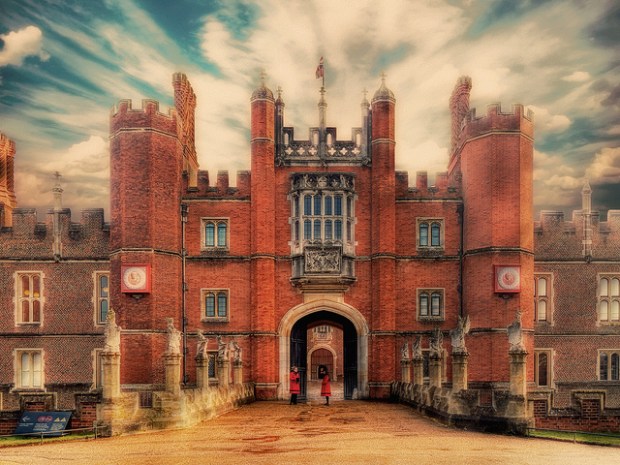
Hi everyone,
Painterly work of the gardens at Hampton Court Palace
Kind regards
Hi,
A big thanks to everyone who has viewed and supported my work on Flickr – https://www.flickr.com/photos/leighkemp/
I’m still very much a big fan of Flickr, I joined and first started posting my stuff back in the spring of 2013. Although I’ve tried other such sites Flickr is still my clear cut favourite. Great friendly community and great creative content.
What I like the best, apart from the strong sense of community, is that they continue to promote “out of the box thinking” and not just straight traditional “photographic” work unlike a few other organisations, one in particular, that I could mention who sadly seem to shun and actively discourage and disparage experimentation and new ideas where they don’t fit in to one of their ready made boxes.
Were he alive today, I wonder what Fox Talbot would have made of such thinking?!.
All the best,
Hi everyone,
Back to rivers 🙂


Kind regards to all,
Hi everyone,
I found these whilst going back through my shots from my trip to Brussels. I forgot just how beautiful it was inside. Four works from the beautiful interior of the Eglise Sainte-Catherine, Brussels. I edited these as HDR. Click image for a larger view on my Flickr page.

Best wishes,
Hi everyone,
An experimental work, Arco di Costantino – Rome
All the best,
